
Networking without DHCP is like a party where every guest has to bring their own chair and figure out where to sit. Sure, it’s possible, but it’s messy, time-consuming, and error-prone. DHCP solves this problem by automatically assigning IP addresses and other network parameters to devices.
What Is DHCP?
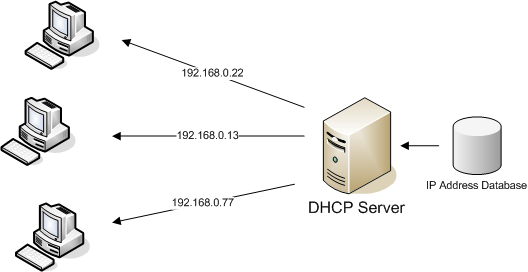
DHCP (Dynamic Host Configuration Protocol) is a network protocol that allows devices (clients) to automatically obtain:
- An IP address
- A subnet mask
- A default gateway
- A DNS server
- (Sometimes) a domain name
Instead of manually configuring every device, the DHCP server does the job for you. This is a lifesaver in networks with dozens, hundreds, or thousands of devices.
Why Do We Need DHCP?
Imagine configuring 500 PCs in a university or 200 smartphones in a company office. Doing it by hand would be insane. DHCP:
- Saves time (no manual IP assignment).
- Reduces configuration errors.
- Makes it easier to reconfigure the network.
- Provides centralized management.
The DHCP Process (DORA)
DHCP works with a four-step handshake often remembered as DORA:
DHCP Discover: The client (new device) broadcasts a message: “Hey, is there any DHCP server out there?”
DHCP Offer: The DHCP server replies with an available IP address and network settings.
DHCP Request: The client says, “Yes, I’d like to use that IP you offered me.”
DHCP Acknowledgment (ACK): The DHCP server confirms: “Great, this IP is yours. You can use it now.”
Diagram:
1
2
3
4
Client   ---- DHCP Discover --->    Server
Client   <--- DHCP Offer --------   Server
Client   ---- DHCP Request ------>  Server
Client   <--- DHCP Ack ---------    Server
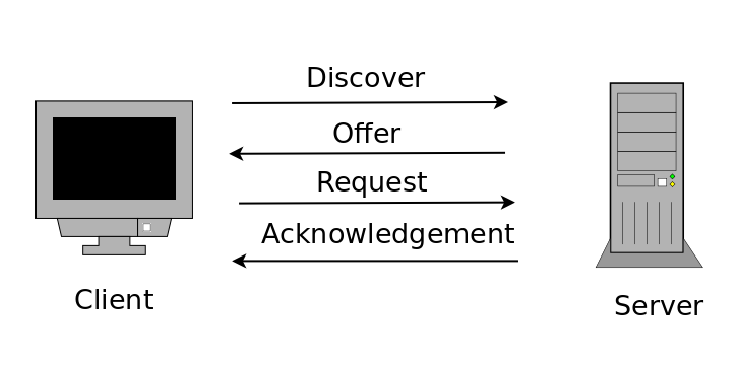
At this point, the device is fully configured and can communicate in the network.
DHCP Configuration on a Router
On Cisco devices, you can configure DHCP directly on the router. Here’s a step-by-step example.
Step 1: Define the DHCP Pool
1
Router(config)# ip dhcp pool ISTA
This creates a DHCP pool named ISTA. Think of it as a container for the settings you’re going to provide to clients.
Step 2: Define the Network Range
1
Router(dhcp-config)# network 192.168.0.0 255.255.255.0
This tells the router that the DHCP pool covers the 192.168.0.0/24 network.
Step 3: Set the Default Gateway
1
Router(dhcp-config)# default-router 192.168.0.1
Clients will use this as their gateway to the outside world.
Step 4: Set the DNS Server
1
Router(dhcp-config)# dns-server 217.17.17.1
This is the server that translates domain names (like google.com) into IP addresses.
Step 5: Set the Domain Name
1
Router(dhcp-config)# domain-name ISTA.MA
This assigns a domain name suffix to clients. For example, a client named pc1 could be resolved as pc1.ISTA.MA.
Step 6: Exclude Specific Addresses
Sometimes you don’t want DHCP to assign certain addresses, for example, the gateway or servers with static IPs.
1
Router(config)# ip dhcp excluded-address 192.168.0.1
Now 192.168.0.1 won’t be given out to clients.
DHCP Relay
In larger networks, clients may be on a different subnet than the DHCP server. By default, DHCP does not cross routers because it uses broadcast messages.
To solve this, you configure a DHCP relay.
1
Router(config-if)# ip helper-address 192.168.2.1
This tells the router to forward DHCP requests to the DHCP server at 192.168.2.1.
Lease Time
One important concept in DHCP is the lease. IP addresses are not given forever; they are leased for a certain time (e.g., 24 hours).
- When half the lease time passes, the client tries to renew it.
- If the server is still available, it extends the lease.
- If not, the client keeps trying until the lease expires.
This ensures efficient use of IP addresses.
DHCP in Action: Example
Imagine a company network:
- DHCP pool:
192.168.10.0/24 - Gateway:
192.168.10.1 - DNS:
8.8.8.8 - Excluded addresses:
192.168.10.1to192.168.10.10(reserved for servers, printer, gateway)
Configuration would look like:
1
2
3
4
5
6
Router(config)# ip dhcp excluded-address 192.168.10.1 192.168.10.10
Router(config)# ip dhcp pool COMPANY
Router(dhcp-config)# network 192.168.10.0 255.255.255.0
Router(dhcp-config)# default-router 192.168.10.1
Router(dhcp-config)# dns-server 8.8.8.8
Router(dhcp-config)# domain-name company.local
Now every PC or phone that connects will automatically get an IP, subnet mask, gateway, and DNS.
Benefits of DHCP
- Scalability: Easy to manage large networks.
- Flexibility: Change network settings in one place.
- Automation: No manual IP headaches.
- Centralization: One server controls the entire network.
When to Use Static IP Instead of DHCP?
DHCP is amazing, but not everything should be dynamic. Some devices need a static IP:
- Routers and switches
- Servers (DNS, DHCP, mail, web servers)
- Printers
- Firewalls
Why? Because these devices provide services that clients depend on. If their IP changes, things break.
Real-World Example
- Home Network: Your ISP’s router is the DHCP server. Your laptop, phone, smart TV all get IPs automatically.
- Enterprise Network: DHCP is usually handled by a Windows Server or a Cisco router.
- Data Centers: Often use DHCP with advanced options like PXE boot for auto-installing operating systems.
This is everything you need to know about DHCP: how it works, why it’s important, how to configure it, and how it fits into real networks.